Let's ignore for a second all the obvious good reasons against building a standalone Node.js app. There are however scenarios in which turning a node-backed application into a single binary is desirable - for instance, if the core logic of your app lives inside a npm module, has to be written in JavaScript or you're just really, really comfortable building Node apps.
In order to achieve this, you'll need to squeeze Node, your app including all node module dependencies and a browser into one binary. Mulitple solutions exist to tackle the issue - the most popular one being Intel's node-webkit. It's the full package:
- supports Windows, Linux and Mac OS X, allowing you to create a cross-platform app
- has basic integration with native features (for instance the clipboard, tray symbols or folder access)
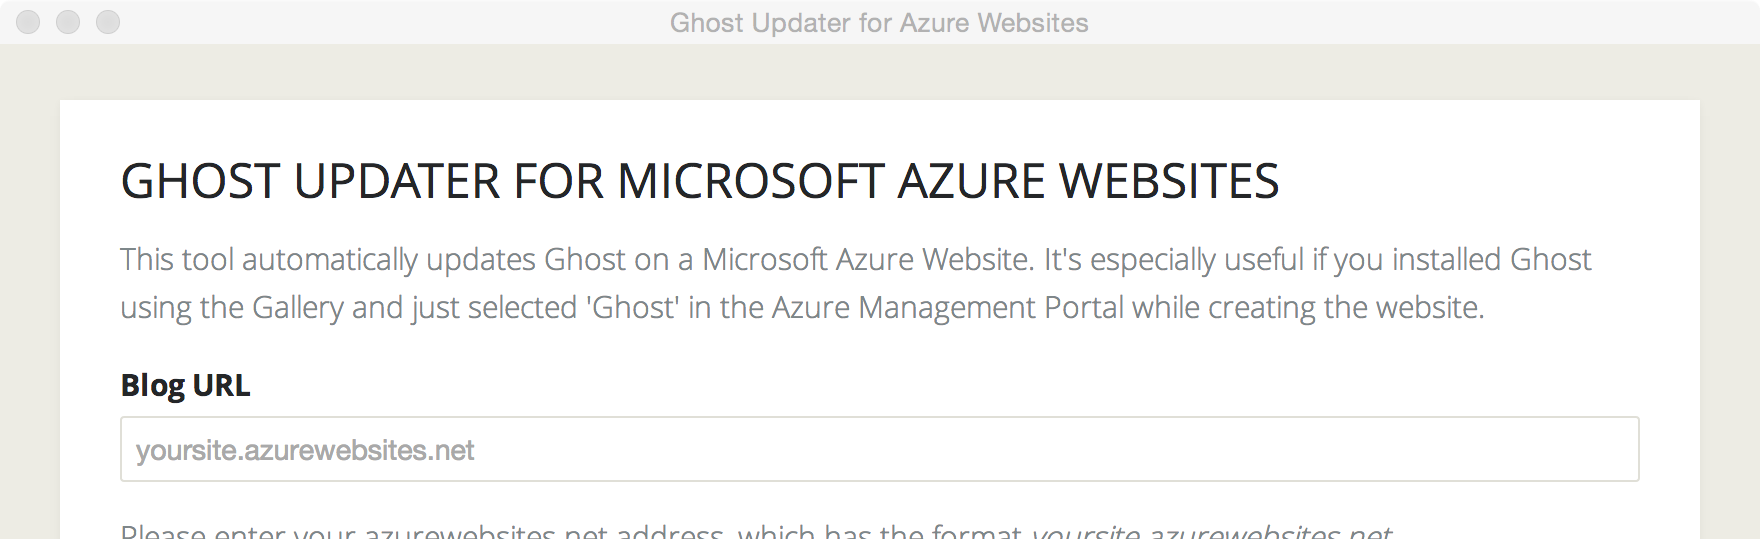
This post will outline the basics of building and packaging a project with node-webkit, but also include some of the things I've learned building the Ghost Updater for Azure. It's worth pointing out that node-webkit makes no difference between Node code and DOM code - nothing keeps you from calling Node Modules right from the DOM (as outlined in the code below). If you're building something that's also supposed to work in a browser, node-webkit will also work with "typical" Node app using Express or other server modules.
<body>
    <script>
        var fs = require('fs');

        fs.readFile('/etc/passwd', function (err, data) {
            if (err) throw err;
            console.log(data);
        });
    </script>
</body>
</html>
Setting Up
Prepping an ordinary Node application for node-webkit is suprisingly simple. Node-webkit's configuration is done in package.json. The key properties are self-explanatory, but a few of them require explanation. Required are only main and name: They describe the entry file as well as the name of the application. window and it's subfields are optional, but allows a detailed configuration of the application window - including things like the icon, the toolbar or size settings. If you're doing crazy things, you can even instruct node-webkit to set your app as a desktop background in X11 environments. You can find the full list of configuration settings here.
If you're implementing a traditional Node app, node-main is of importance - it defines an optional Node entry point. If you just start node-webkit without this setting, it'll instruct the browser component to open up your main file, but that doesn't mean that your Express server is started. You could require('./app.js') in your index.html, but node-main has the benefit of not being destructed across page navigation in Webkit - think of it as the equivalent of running node app.js.
{
  "main": "index.html",
  "name": "node-webkit",
  "node-main": "app.js"
  "window": {
    "title": "node-webkit demo",
    "icon": "link.png",
    "toolbar": true,
    "frame": false,
    "width": 800,
    "height": 500,
    "position": "mouse",
    "min_width": 400,
    "min_height": 200,
    "max_width": 800,
    "max_height": 600
  },
  "webkit": {
    "plugin": true
  }
}
Next, create an html file that serves as the static entry point. You can either directly interact with Node Modules from within that file - or kick of your Node app using node-main and just redirect to your Node app's server location.
<head>
    <script>
        function bodyOnLoad(){
            window.location.assign('http://localhost:3000/');
        }
    </script>
</head>
<body onload="bodyOnLoad()">
</body>
At this point, your app is ready to be packaged up, which involves quite a bit of manual work. Obviously, I recommend automating that stuff, so if feel free to jump ahead to "Integration Into Your Build Process".
If you'd first like to take your app for a quick test run, you need to zip up your app including node_modules - with package.json being in the root of your zip file. Rename the package to app.nw. Install Node Webkit. On Windows, you can drag your app.nw package on to nw.exe. On Mac OS X, you'll find the nw binary inside the node-webkit application package, so you can run your package with using Terminal and the following command: /Applications/node-webkit.app/Contents/MacOS/node-webkit app.nw.
Integration Into Your Build Process
Steffen Müller built the node-webkit-builder, which automates the process of building your node-webkit apps for mac, win and linux v. It will download the prebuilt binaries for a newest version, unpacks it, creates a release folder, create the app.nw file for a specified directory and combines the created package with the node-webkit binary. Good stuff.
Even better though is that he also built a Grunt plugin. You can install it with npm install grunt-node-webkit-builder --save-dev. To activate the Grunt task, register the plugin with grunt.loadNpmTasks('grunt-node-webkit-builder'); in your Gruntfile.
The Grunt plugin accepts the same arguments that node-webkit-builder does, so the config inside the Gruntfile could look like this:
grunt.initConfig({
    nodewebkit: {
        options: {
            platforms: ['win','osx'],
            buildDir: './builds',
            macIcns: 'myIcons.icns',
            winIco: 'myIcons.ico',
            macZip: false
        },
        src: ['./example/public/**/*']
    }
})
Two things worth calling out: Including icons is a lot of manual work, too. Luckily, node-webkit-builder accepts icns and ico files for Windows and Mac OS X. On Mac OS only, you don't really need to zip up app.nw - you may just use a folder. That naturally increases the file size, but it does improve the startup time of your app dramatically.
After you're done setting up your build process, you can compile your app with a simple grunt nodewebkit. Done!