If you're building desktop apps, you should code-sign them. Code signatures are like https for your applications: They allow both operating systems and users to verify that the application they're running was in fact created by you. Even if both you and your users do not care about security (even though y'all should), you will certainly care that both macOS and Windows will refuse to download and execute your application without warning your users about the scary dangers involved. The warnings are scary enough that non-technical users will likely not be able to run your apps. In fact, tutorials on how to open unsigned apps on macOS Catalina are pretty lengthy.
In summary: We need to code-sign our apps. Doing so on our local machines where said certificates are already installed is usually fairly straightforward, but how do you do it in CI? Here's how I code-sign my applications in CI providers like AppVeyor, Circle, or Travis.
If you're wondering what the benefit is: I want to be able to release new versions of my apps without sitting in front of both a Windows and a macOS machine. Building and signing in CI allows me to change a file from my phone and still get fully signed binaries.
Windows
A Windows Authenticode code-signing certificate can be bought from a number of re-sellers and can usually be found at companies also selling certificates for use with https. I prefer DigiCert.
Once bought, plugging the certificate into your build pipeline should be fairly straightforward - tools like electron-winstaller, electron-forge, or electron-builder all accept the certificate file as pfx and a password as input. Check your build tool's documentation and ensure that code-signing your application works locally. Once it does, we'll move on to doing it in CI.
The end result we're working towards is that your build tool's configuration uses environment variables. In the case of my little app windows95, the electron-forge configuration for the Windows packages looks like this:
{
  name: '@electron-forge/maker-squirrel',
  platforms: ['win32'],
  config: (arch) => {
    return {
      name: 'windows95',
      authors: 'Felix Rieseberg',
      exe: 'windows95.exe',
      noMsi: true,
      remoteReleases: '',
      setupExe: `windows95-${package.version}-setup-${arch}.exe`,
      setupIcon: path.resolve(__dirname, 'assets', 'icon.ico'),
      certificateFile: process.env.WINDOWS_CERTIFICATE_FILE,
      certificatePassword: process.env.WINDOWS_CERTIFICATE_PASSWORD
    }
  }
}
You might not want to check your certificate in with the rest of your code, regardless of whether or not it's protected with a password. Instead, we'll encode your whole pfx certificate file as base64, add it as a secure environment variable to our build environment, and create the file on disk at build time.
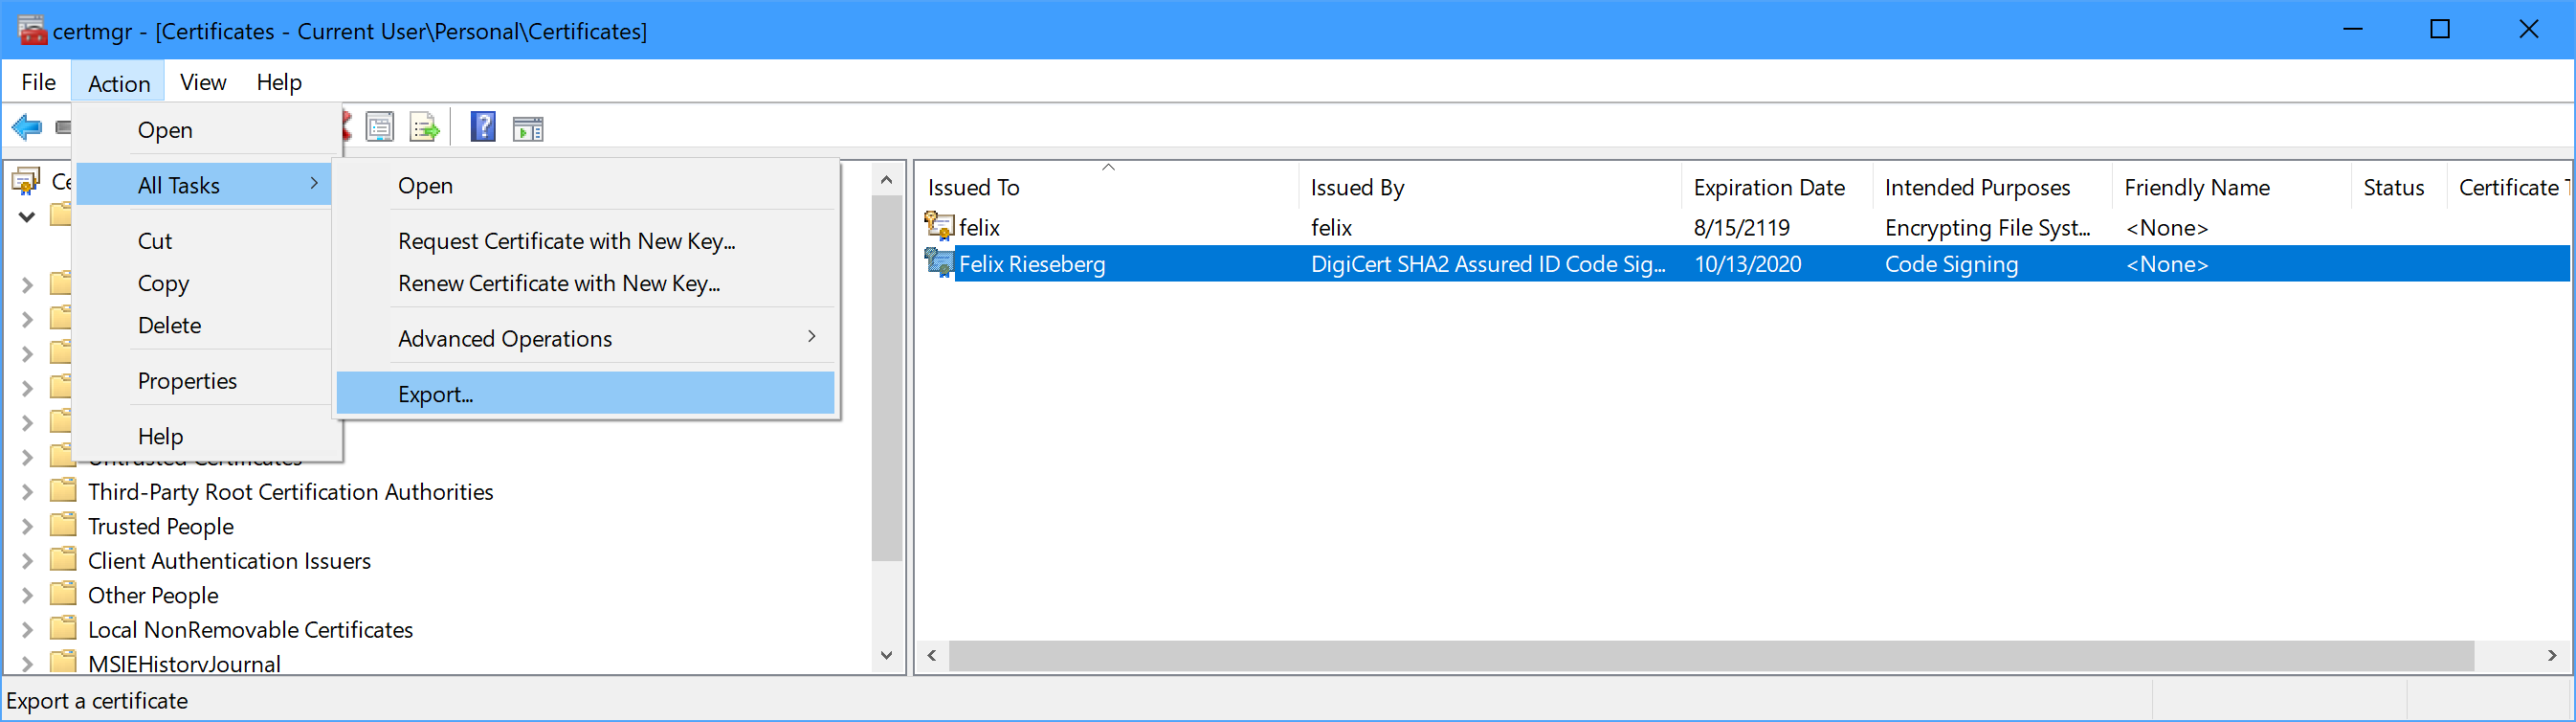
Let's start by turning your pfx file into a base64 string. As a first step, we need to export our certificate as a password-protected pfx file. To do so on Windows, open the app certmgr, included with all versions of Windows. Then, find your certificate (it'll likely be in the Personal/Certificates folder). Select the certificate and find the Export option in the Action - All Tasks menu. The export wizard will open, guiding you through the task of creating a pfx/p12 file. Include the private key, don't include the certificate chain, and do certainly set a password.
Next, we'll need to turn the file into a string. The PowerShell command below will output your certificate as base64.
$file = ~/my-certificate.pfx
$b64 = [Convert]::ToBase64String([IO.File]::ReadAllBytes($file))
Write-Host $b64
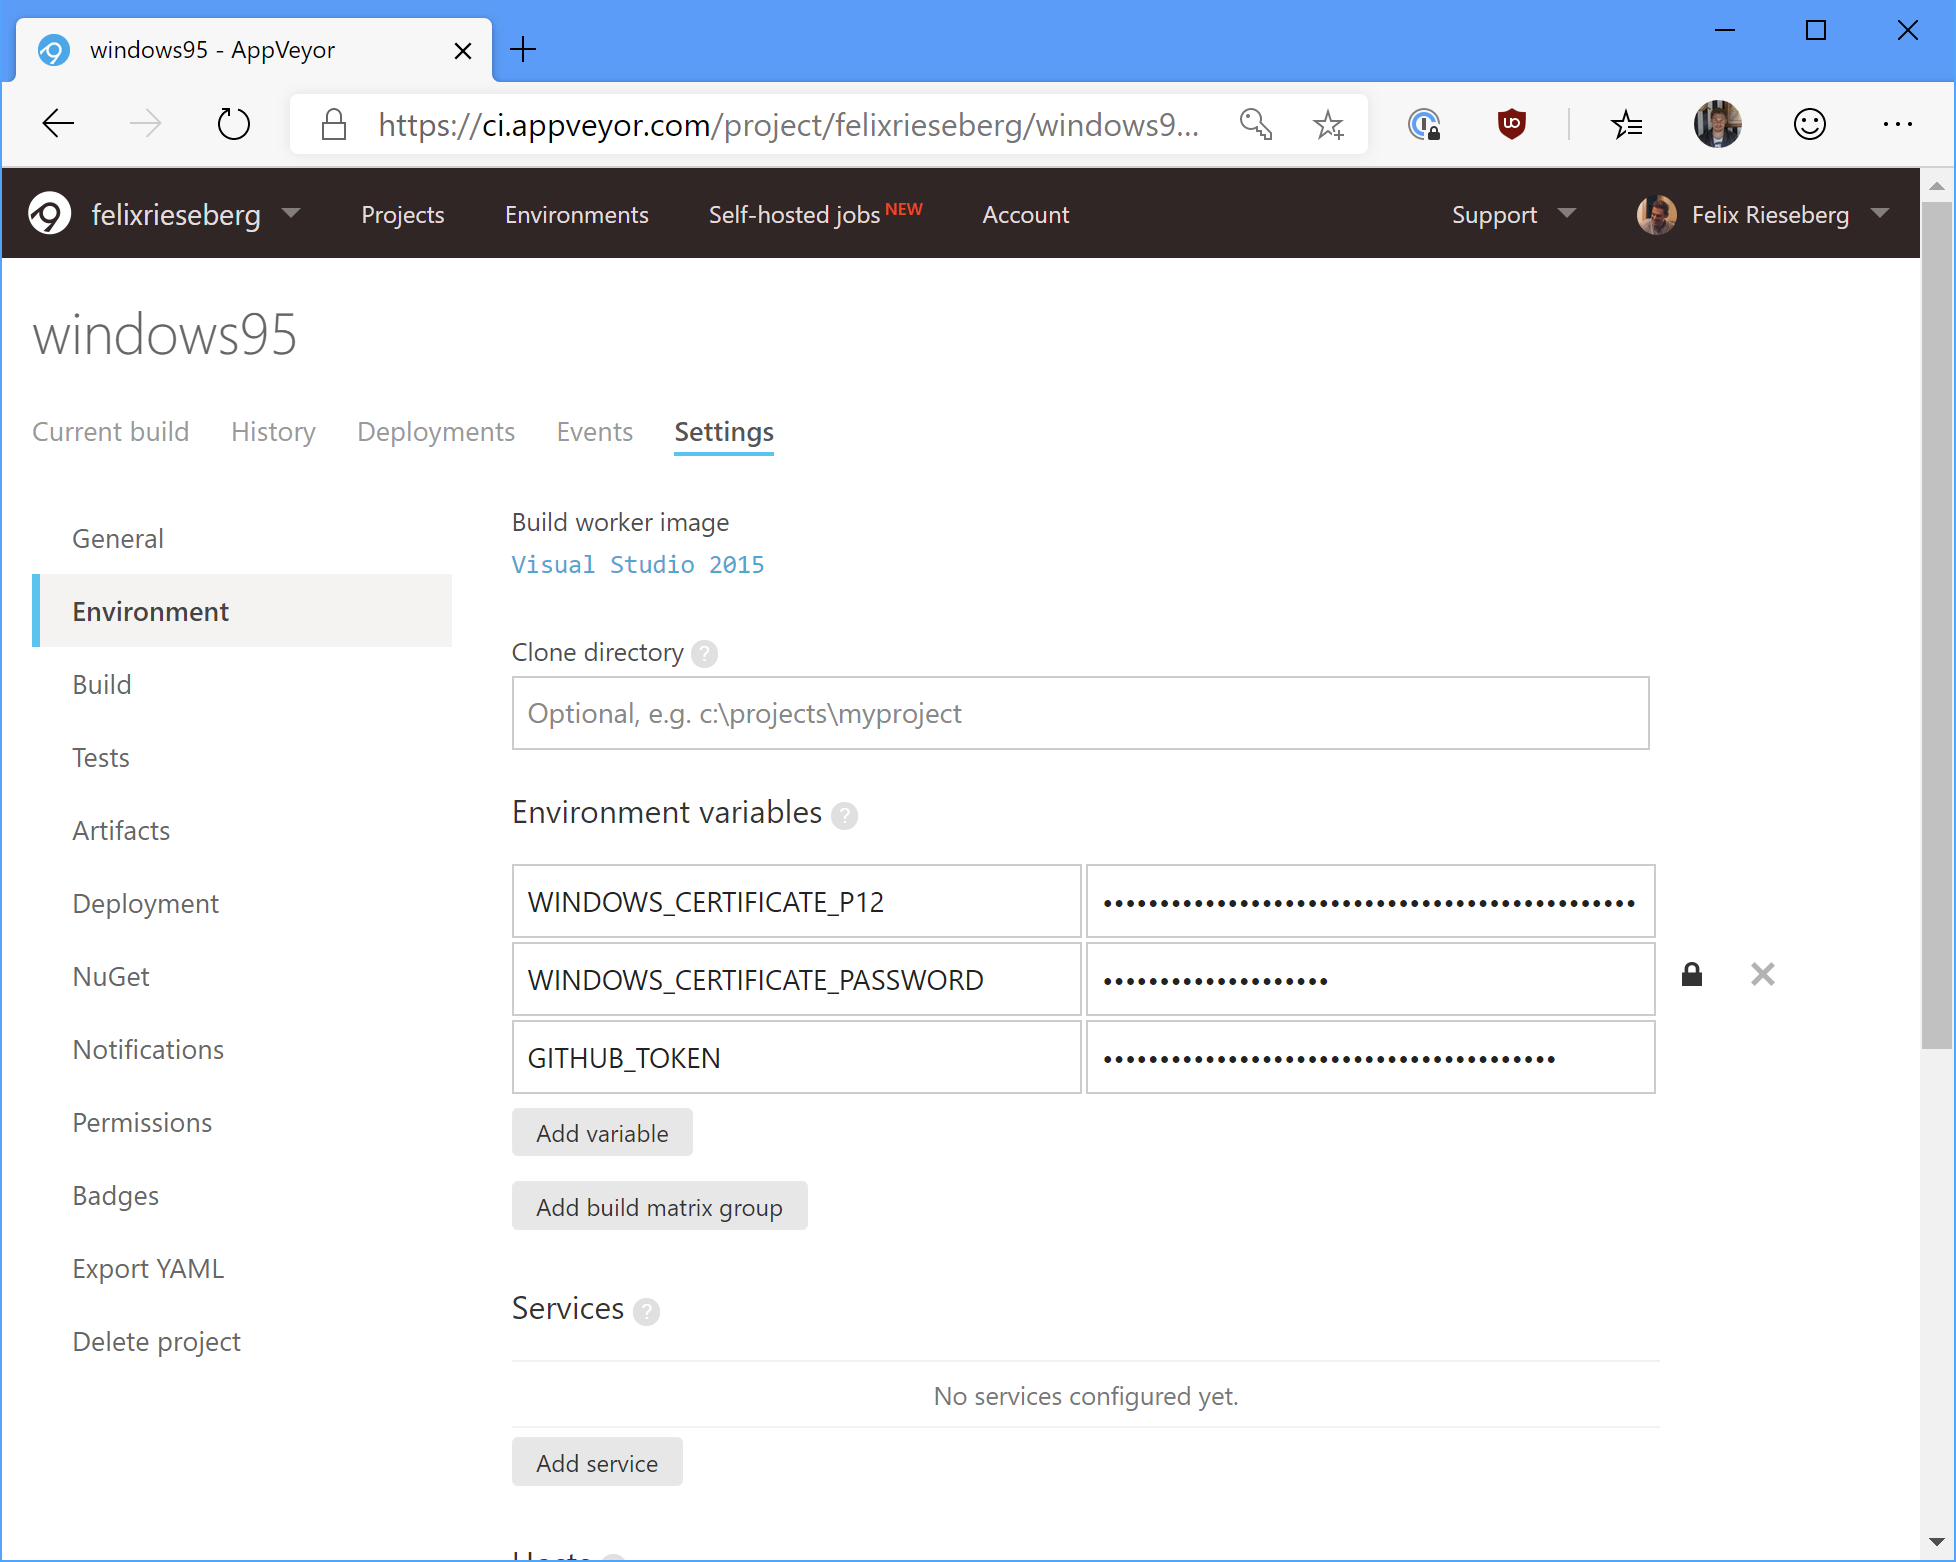
Then, copy that whole string and set it as an environment variable called WINDOWS_CERTIFICATE_P12 in your build environment. Most CI providers allow you to set secret environment variables - in the case of AppVeyor, ensure that the setting "Enable secure variables in Pull Requests from the same repository only" is enabled.
In the next step, we need to add some PowerShell magic to our build script to turn our WINDOWS_CERTIFICATE_P12 environment variable into a WINDOWS_CERTIFICATE_FILE one. Here's the annotated script I'm using during the "install" phase of my build.
# Only do this if WINDOWS_CERTIFICATE_P12 is set
if (Test-Path Env:\WINDOWS_CERTIFICATE_P12) {
  # Which directory are we in right now?
  $workingDirectory = Convert-Path (Resolve-Path -path ".")

  # Absolute path to the certificate file we'll create
  $filename = "$workingDirectory\cert.p12"

  # Turn our base64 environment variable into usable bytes
  $bytes = [Convert]::FromBase64String($env:WINDOWS_CERTIFICATE_P12)

  # Then, write them to disk
  [IO.File]::WriteAllBytes($filename, $bytes)

  # Finally, set the WINDOWS_CERTIFICATE_FILE environment variable
  $env:WINDOWS_CERTIFICATE_FILE = $filename
}
For Windows, that's it! You don't actually need to import the certificate into the build machine's certificate store - and since it's not necessary, I recommend that you do not do it.
macOS
With Apple, code-signing begins with getting an Apple Developer Account. Then, generate, download, and install your personal signing certificates. Just like on Windows, this tutorial assumes that you can already code-sign your app on your local machine.
Since the macOS signing tools always use the system's certificate store (as opposed to a file), we'll need to install the certificate to your build machine. Scary stuff, but certainly doable.
First, export your certificate as a pfx/p12 file. For more details on how to do so, consult this helpful tutorial by DigiCert. Then, turn that file into a base64 string we can set as a secure environment variable. To do so in bash, run the following command:
base64 -i my-certificate.pfx -o my-certificate.b64
Now that we have a base64 string representation of our certificate, add it to your build environment as a secure environment variable and call it MACOS_CERT_P12. We'll also need Apple's Developer Relations certificates. Since you only have the public versions of those available to you, feel free to just check them into your code. You can find them in your very own Keychain or in the windows95 repository.
Next, we'll have to tackle the build environment itself. Simply turning our base64 string back into a file isn't enough - we need to create a new macOS keychain, import all required certificates, and finally set it as the default keychain so that the Xcode signing tools know where to find your certificate. Here's an annotated version of the script I'm using on Travis CI:
# Set the filename
export CERTIFICATE_P12=cert.p12;

# Decode the environment variable into our file
echo $MACOS_CERT_P12 | base64 --decode > $CERTIFICATE_P12;

# Let's invent a new keychain
export KEYCHAIN=build.keychain;

# Create the keychain with a password (travis)
security create-keychain -p travis $KEYCHAIN;

# Make the custom keychain default, so xcodebuild will use it for signing
security default-keychain -s $KEYCHAIN;

# Unlock the keychain
security unlock-keychain -p travis $KEYCHAIN;

# Add certificates to keychain and allow codesign to access them

# 1) Apple Worldwide Developer Relations Certification Authority
security import ./assets/certs/apple.cer -k ~/Library/Keychains/$KEYCHAIN -T /usr/bin/codesign
# 2) Developer Authentication Certification Authority
security import ./assets/certs/dac.cer -k ~/Library/Keychains/$KEYCHAIN -T /usr/bin/codesign
# 3) Developer ID (That's you!)
security import $CERTIFICATE_P12 -k $KEYCHAIN -P $MACOS_CERT_PASSWORD -T /usr/bin/codesign 2>&1 >/dev/null;

# Let's delete the file, we no longer need it
rm $CERTIFICATE_P12;

# Set the partition list (sort of like an access control list)
security set-key-partition-list -S apple-tool:,apple: -s -k travis $KEYCHAIN

# Echo the identity, just so that we know it worked.
# This won't display anything secret.
security find-identity -v -p codesigning
...and that's it! I mostly wrote this blog post because I need to repeat this process whenever my certificates expire, at which point I usually forgot how to actually do it.