In this post, I'll explain how to port shaders made with and for Shadertoy to Three.js.
Shadertoy is an online community and tool for creating and sharing shaders through WebGL, used for both learning and teaching 3D computer graphics in a web browser. Crucially, it's also where I often find inspiration for amazing shaders — being left in awe with the amount of creativity people have. Turning math into pretty images is a skill I admire so much.
I'm more of a web developer myself - and I sometimes find myself trying to re-use parts of Shadertoy shaders in Three.js scenes in web apps (only where allowed and with proper attribution, of course). Porting Shadertoy shaders over to Three.js is surprisingly straightforward, but it took me a while to figure it out - none of the popular LLMs knew about it, neither could I find anything with Google. If you're trying to do the same thing, let me tell you how.
Scene Setup
There are dozens of ways to setup a Three.js scene - and which one you choose doesn't matter for the steps below. Below, I'm using TypeScript, React, and react-three-fiber, but don't worry about those choices if you made different ones. The way you'll interact with the shaders below remains the same and the changes I'm making should easily translate to other frameworks and libraries.
In short, I'm setting up a scene, an orthographic camera, a simple plane mesh, and a shader material. <ShaderMaterial /> is a custom component that we'll cover in the next step. For now, let's call out the only weird thing: We're setting a new key on the <Canvas /> every time the window size changes. That's necessary because shaders tend to break if we try to change the resolution on them dynamically, so we'll likely have to reset the entire renderer. You'll also have to do this whenever you want to swap out the shader dynamically. Whenever your Canvas goes black after some kind of interaction, simply make sure you update your key - or whatever the equivalent is in your framework or web app.
import { useEffect, useState } from "react";

import { invalidate, Canvas } from "@react-three/fiber";
import { OrthographicCamera } from "@react-three/drei";

import { ShaderMaterial } from "./shader-material";
import { useWindowSize } from "../hooks/use-window-size";

export function ShaderCanvas() {
  const { innerWidth, innerHeight } = useWindowSize();
  const [ key, setKey ] = useState(`${innerWidth}-${innerHeight}`);

  // The shaders tend to be brittle and tend to break when we
  // change the window size or the underlying shader material.
  //
  // To force rerenders, we use a unique key for the canvas
  // that changes whenever the window size changes.
  useEffect(() => {
    setKey(`${innerWidth}-${innerHeight}`);
    invalidate();
  }, [innerWidth, innerHeight, key]);

  return (
    <Canvas
      style={{
        width: '100%',
        height: '100%',
        position: 'absolute',
        top: 0,
        left: 0,
      }}
      camera={{ position: [0, 0, 1] }}
      key={key}
    >
      <OrthographicCamera
        makeDefault
        left={-1}
        right={1}
        top={1}
        bottom={-1}
        near={0.1}
        far={1000}
        position={[0, 0, 1]}
      />
      <mesh scale={[2, 2, 1]}>
        <planeGeometry />
        <ShaderMaterial />
      </mesh>
    </Canvas>
  );
}
shader-canvas.tsx
If you're curious about the useWindowSize() hook, here's the one I tend to use:
import { useEffect, useState } from "react";
import { debounce } from "lodash";

export function useWindowSize() {
  const [size, setSize] = useState({
    innerWidth: window.innerWidth,
    innerHeight: window.innerHeight
  });

  useEffect(() => {
    const handleResize = () => {
      setSize({
        innerWidth: window.innerWidth,
        innerHeight: window.innerHeight
      });
    };

    const debouncedHandleResize = debounce(handleResize, 250);
    window.addEventListener('resize', debouncedHandleResize);

    return () => {
      window.removeEventListener('resize', debouncedHandleResize);
    }
  }, []);

  return size;
}
use-window-size.ts
ShaderMaterial
Below, I'm setting up a Three.js ShaderMaterial and making important additions to enable Shadertoy shaders.
First, we're importing two shaders: A FragmentShader and a VertexShader. We'll cover the definitions of both later. Let's cover everything noteworthy here:
Mouse Interaction
Mouse interactions: Shadertoy uses a "pixels from the bottom left" coordinate system, so we'll have to re-calculate mouse events. You'll notice that I'm multiplying values by window.devicePixelRatio - this ensures that your shader is dealing with the correct resolution.
Uniforms
Uniforms: A uniform is a "global shader variable". We'll have to inject the variables that are always available in Shadertoy. Below, I'm covering the most popular ones (iTime, iTimeDelta, iResolution, iMouse). The flow is always the same: We first declare the uniform and its type in our Three.js ShaderMaterial and will then also declare it later in our FragmentShader.
All uniforms available are below. Search your shader for these values, and if they exist, add them following the same pattern I'm using below.
uniform vec3 iResolution;
uniform float iTime;
uniform float iTimeDelta;
uniform float iFrame;
uniform float iChannelTime[4];
uniform vec4 iMouse;
uniform vec4 iDate;
uniform float iSampleRate;
uniform vec3 iChannelResolution[4];
uniform samplerXX iChanneli;
All the Shadertoy uniforms
You'll also notice that I'm manually updating the uniforms on each frame.
import { useRef, useState, useEffect, useMemo, useContext } from "react";

import { useFrame } from "@react-three/fiber";
import * as THREE from 'three'

import fragmentShader from './shaders/fragment.glsl'
import vertexShader from './shaders/vertex.glsl'

export function ShaderMaterial() {
  const materialRef = useRef<THREE.ShaderMaterial>()
  const [mouse, setMouse] = useState({ x: 0, y: 0 })
  const dpr = window.devicePixelRatio

  useEffect(() => {
    const handleMouseMove = (event: MouseEvent) => {
      // Convert mouse position to Shadertoy's coordinate system
      // (pixels from bottom-left)
      setMouse({
        x: event.clientX * dpr,
        y: (window.innerHeight - event.clientY) * dpr
      });
    };

    window.addEventListener('mousemove', handleMouseMove);
    return () => window.removeEventListener('mousemove', handleMouseMove);
  }, []);

  const uniforms = useMemo(() => ({
    iTime: { value: 0.0 },
    iTimeDelta: { value: 0.0 },
    iResolution: { value: new THREE.Vector2(1, 1) },
    iMouse: { value: new THREE.Vector3(0, 0, 1) }
  }), [])

  useFrame((state) => {
    if (materialRef.current) {
      const { uniforms } = materialRef.current;
      const { elapsedTime } = state.clock;

      uniforms.iTime.value = elapsedTime;
      uniforms.iTimeDelta.value = elapsedTime - uniforms.iTime.value;
      uniforms.iResolution.value.set(
        window.innerWidth * dpr,
        window.innerHeight * dpr,
        1
      );
      uniforms.iMouse.value.set(mouse.x, mouse.y, 1);
    }
  })

  return (
    <shaderMaterial
      ref={materialRef as React.RefObject<THREE.ShaderMaterial>}
      vertexShader={vertexShader}
      fragmentShader={fragmentShader}
      uniforms={uniforms}
    />
  )
}
shader-material.tsx
FragmentShader
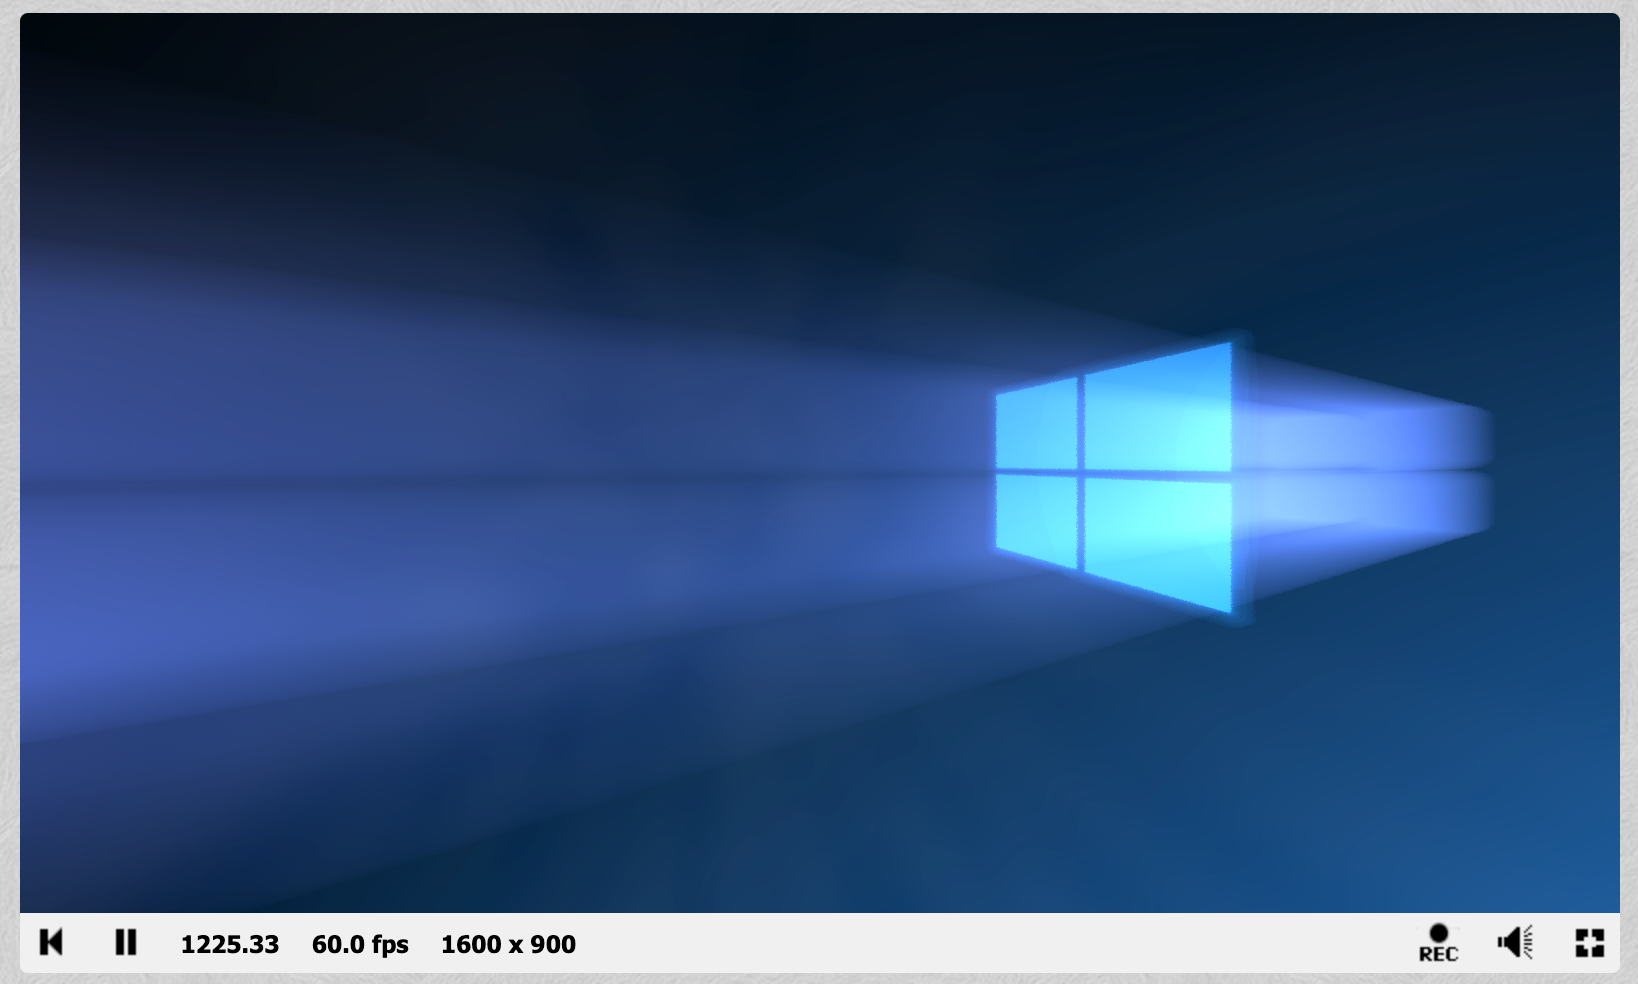
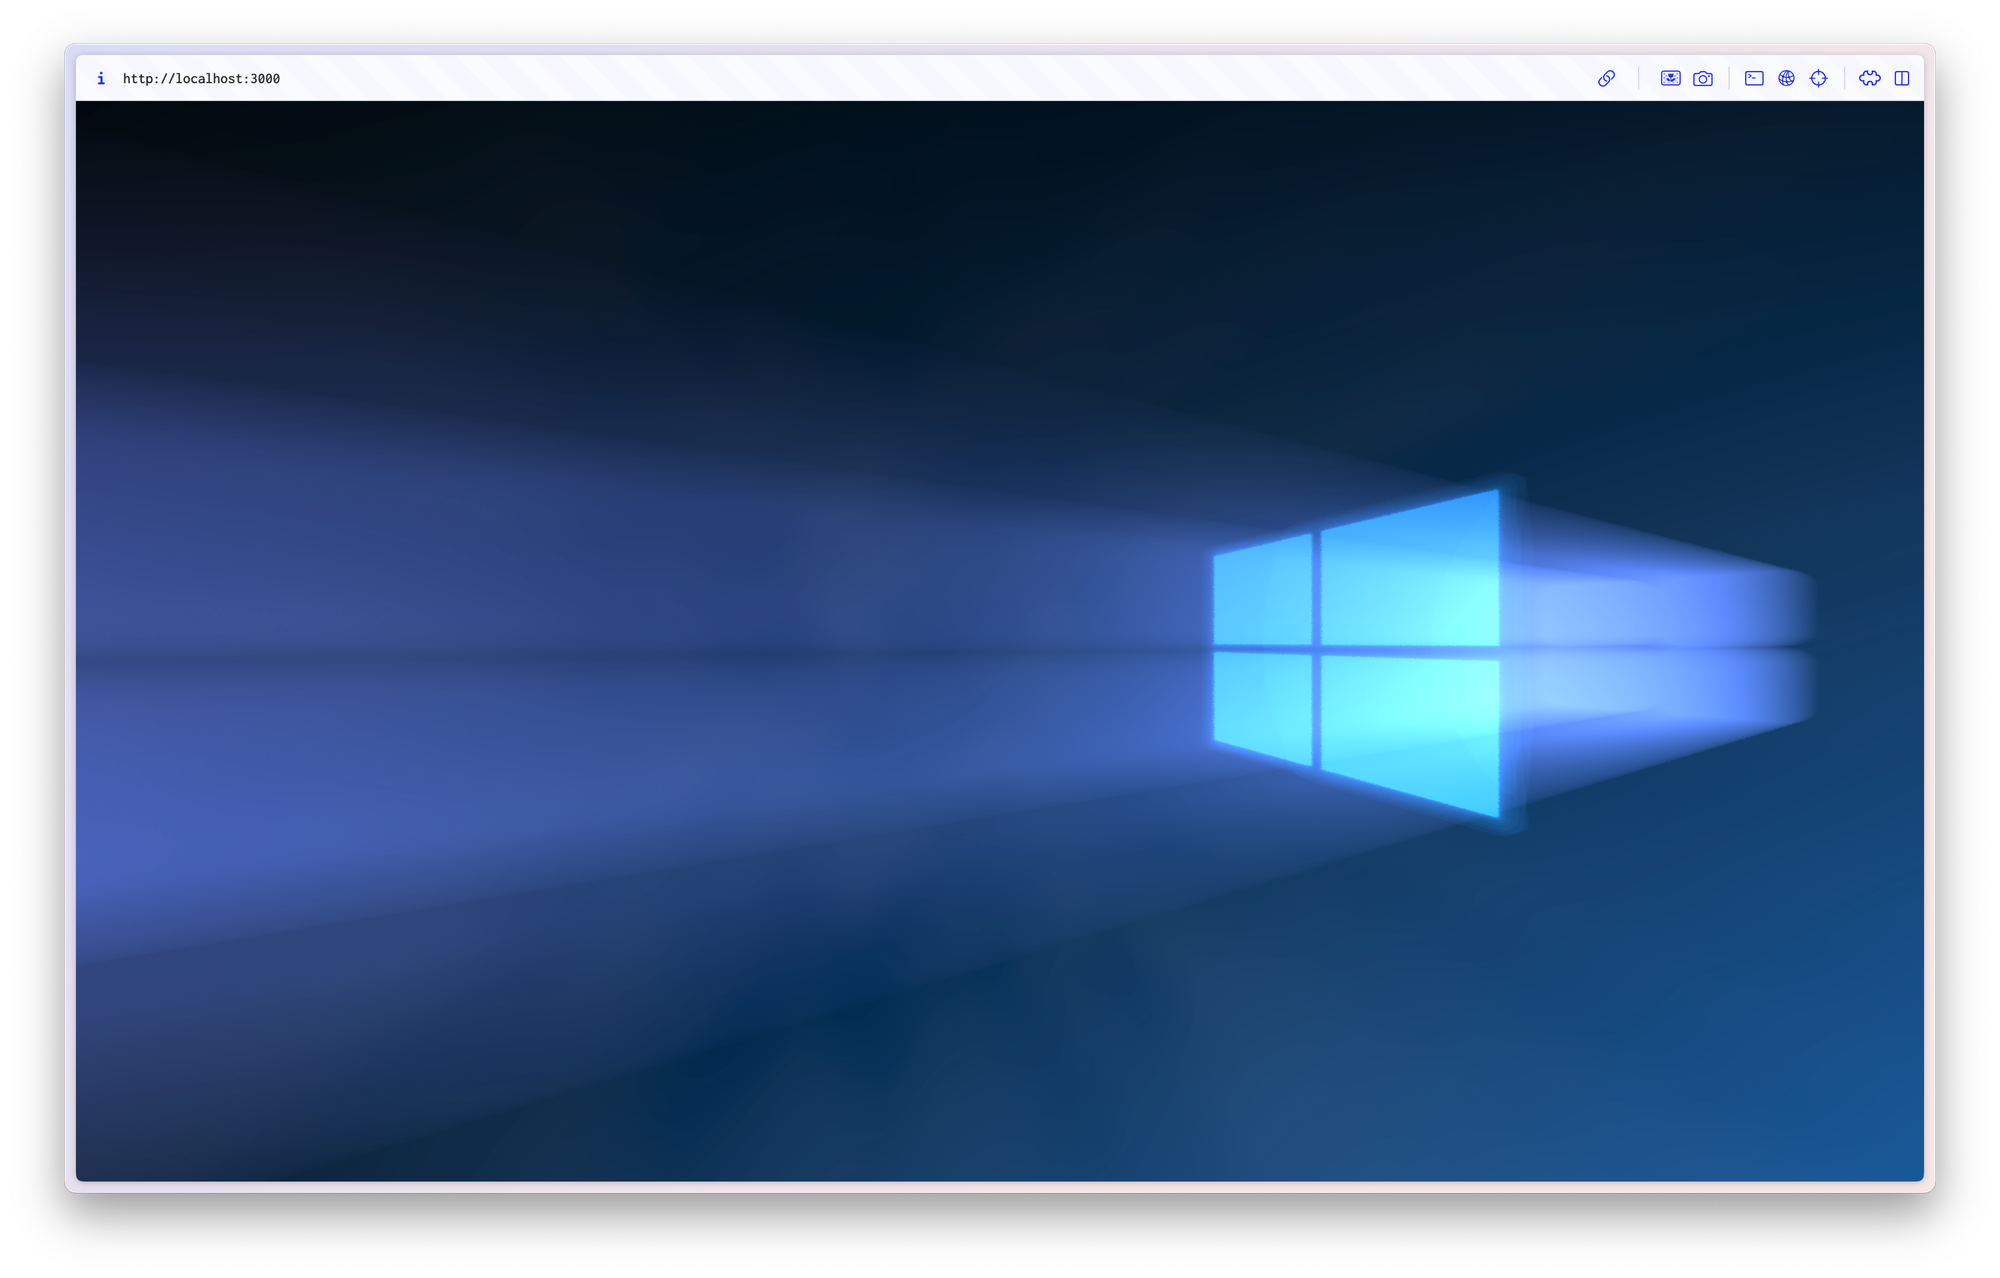
This is where we'll actually "port" the Shadertoy shader. Let's take this animated Windows 10 "wallpaper" as an example. Credits go to gyabo (and, I assume, Microsoft).
The code for that shader is fairly simple:
#define PI     3.1415926535897921284
#define REP    25
#define d2r(x) (x * PI / 180.0)
#define WBCOL  (vec3(0.5, 0.7,  1.7))
#define WBCOL2 (vec3(0.15, 0.8, 1.7))

float hash( vec2 p ) {
	float h = dot( p, vec2( 127.1, 311.7 ) );
	return fract( sin( h ) * 458.325421) * 2.0 - 1.0;
}

float noise( vec2 p ) {
	vec2 i = floor( p );
	vec2 f = fract( p );

	f = f * f * ( 3.0 - 2.0 * f );

	return mix(
		mix( hash( i + vec2( 0.0, 0.0 ) ), hash( i + vec2( 1.0, 0.0 ) ), f.x ),
		mix( hash( i + vec2( 0.0, 1.0 ) ), hash( i + vec2( 1.0, 1.0 ) ), f.x ),
		f.y
	);
}

vec2 rot(vec2 p, float a) {
	return vec2(
		p.x * cos(a) - p.y * sin(a),
		p.x * sin(a) + p.y * cos(a));
}

float nac(vec3 p, vec2 F, vec3 o) {
	const float R = 0.0001;
	p += o;
	return length(max(abs(p.xy)-vec2(F),0.0)) - R;
}

float by(vec3 p, float F, vec3 o) {
	const float R = 0.0001;
	p += o;
	return length(max(abs(mod(p.xy, 3.0))-F,0.0)) - R;
}


float recta(vec3 p, vec3 F, vec3 o) {
	const float R = 0.0001;
	p += o;
	return length(max(abs(p)-F,0.0)) - R;
}


float map1(vec3 p, float scale) {
	float G = 0.50;
	float F = 0.50 * scale;
	float t =  nac(p, vec2(F,F), vec3( G,  G, 0.0));
	t = min(t, nac(p, vec2(F,F), vec3( G, -G, 0.0)));
	t = min(t, nac(p, vec2(F,F), vec3(-G,  G, 0.0)));
	t = min(t, nac(p, vec2(F,F), vec3(-G, -G, 0.0)));
	return t;
}

float map2(vec3 p) {
	float t = map1(p, 0.9);
	//t = max(t, recta(p, vec3(1.0, 1.0, 0.02), vec3(0.0, 0.0, 0.0)));
    t = max(t, recta(p, vec3(1.0, 1.0, 0.02), vec3(0.0, 0.0, 0.0)));
	return t;
}

// http://glslsandbox.com/e#26840.0
float gennoise(vec2 p) {
	float d = 0.5;
	mat2 h = mat2( 1.6, 1.2, -1.2, 1.6 );

	float color = 0.0;
	for( int i = 0; i < 2; i++ ) {
		color += d * noise( p * 5.0 + iTime);
		p *= h;
		d /= 2.0;
	}
	return color;
}

void mainImage( out vec4 fragColor, in vec2 fragCoord ) {
    fragColor = vec4(0.0);
    for(int count = 0 ; count < 2; count++) {
        vec2 uv = -1.0 + 2.0 * ( fragCoord.xy / iResolution.xy );
        uv *= 1.4;
        uv.x += hash(uv.xy + iTime + float(count)) / 512.0;
        uv.y += hash(uv.yx + iTime + float(count)) / 512.0;
        vec3 dir = normalize(vec3(uv * vec2(iResolution.x / iResolution.y, 1.0), 1.0 + sin(iTime) * 0.01));
        dir.xz = rot(dir.xz, d2r(70.0));
        dir.xy = rot(dir.xy, d2r(90.0));
        vec3 pos    = vec3(-0.1 + sin(iTime * 0.3) * 0.1, 2.0 + cos(iTime * 0.4) * 0.1, -3.5);
        vec3  col   = vec3(0.0);
        float t     = 0.0;
        float M     = 1.002;
        float bsh   = 0.01;
        float dens  = 0.0;

        for(int i = 0 ; i < REP * 24; i++) {
            float temp = map1(pos + dir * t, 0.6);
            if(temp < 0.2) {
                col += WBCOL * 0.005 * dens;
            }
            t += bsh * M;
            bsh *= M;
            dens += 0.025;
        }

        //windows
        t = 0.0;
        float y = 0.0;
        //for(int i = 0 ; i < REP * 50; i++)
        for(int i = 0 ; i < REP; i++)
        {
            float temp = map2(pos + dir * t);
            if(temp < 0.1) {
                //col += WBCOL2 * 0.005;
                col += WBCOL2 * 0.5;
            }
            t += temp;
            y++;
        }
        col += ((2.0 + uv.x) * WBCOL2) + (y / (25.0 * 50.0));
        col += gennoise(dir.xz) * 0.5;
        col *= 1.0 - uv.y * 0.5;
        col *= vec3(0.05);
        col  = pow(col, vec3(0.717));
        fragColor += vec4(col, 1.0 / (t));
    }
    fragColor /= vec4(2.0);
}
To port it over, we'll need to do the following things:
Add our uniforms
At the top, add our uniforms:
uniform float iTime;
uniform float iTimeDelta;
uniform vec2 iResolution;
uniform vec3 iMouse;

// ...rest of the shader
Add a main() function
Then, at the bottom, add a main() function that calls the default Shadertoy mainImage() function:
// ...rest of the shader

void main() {
  mainImage(gl_FragColor, gl_FragCoord.xy);
}
VertexShader
The VertexShader doesn't have to do a lot of work, we do most of it in the FragmentShader. This default one should work for almost all ShaderToy shaders:
varying vec2 vUv;

void main() {
    vUv = uv;
    gl_Position = projectionMatrix * modelViewMatrix * vec4(position, 1.0);
}
Tweaking Things
For most shaders, the work done above should be enough. However, some shaders might require a bit of surgery to ensure correct colors. When you run the example above for instance, you'll discover that you see bright shapes but not at all what you expected:
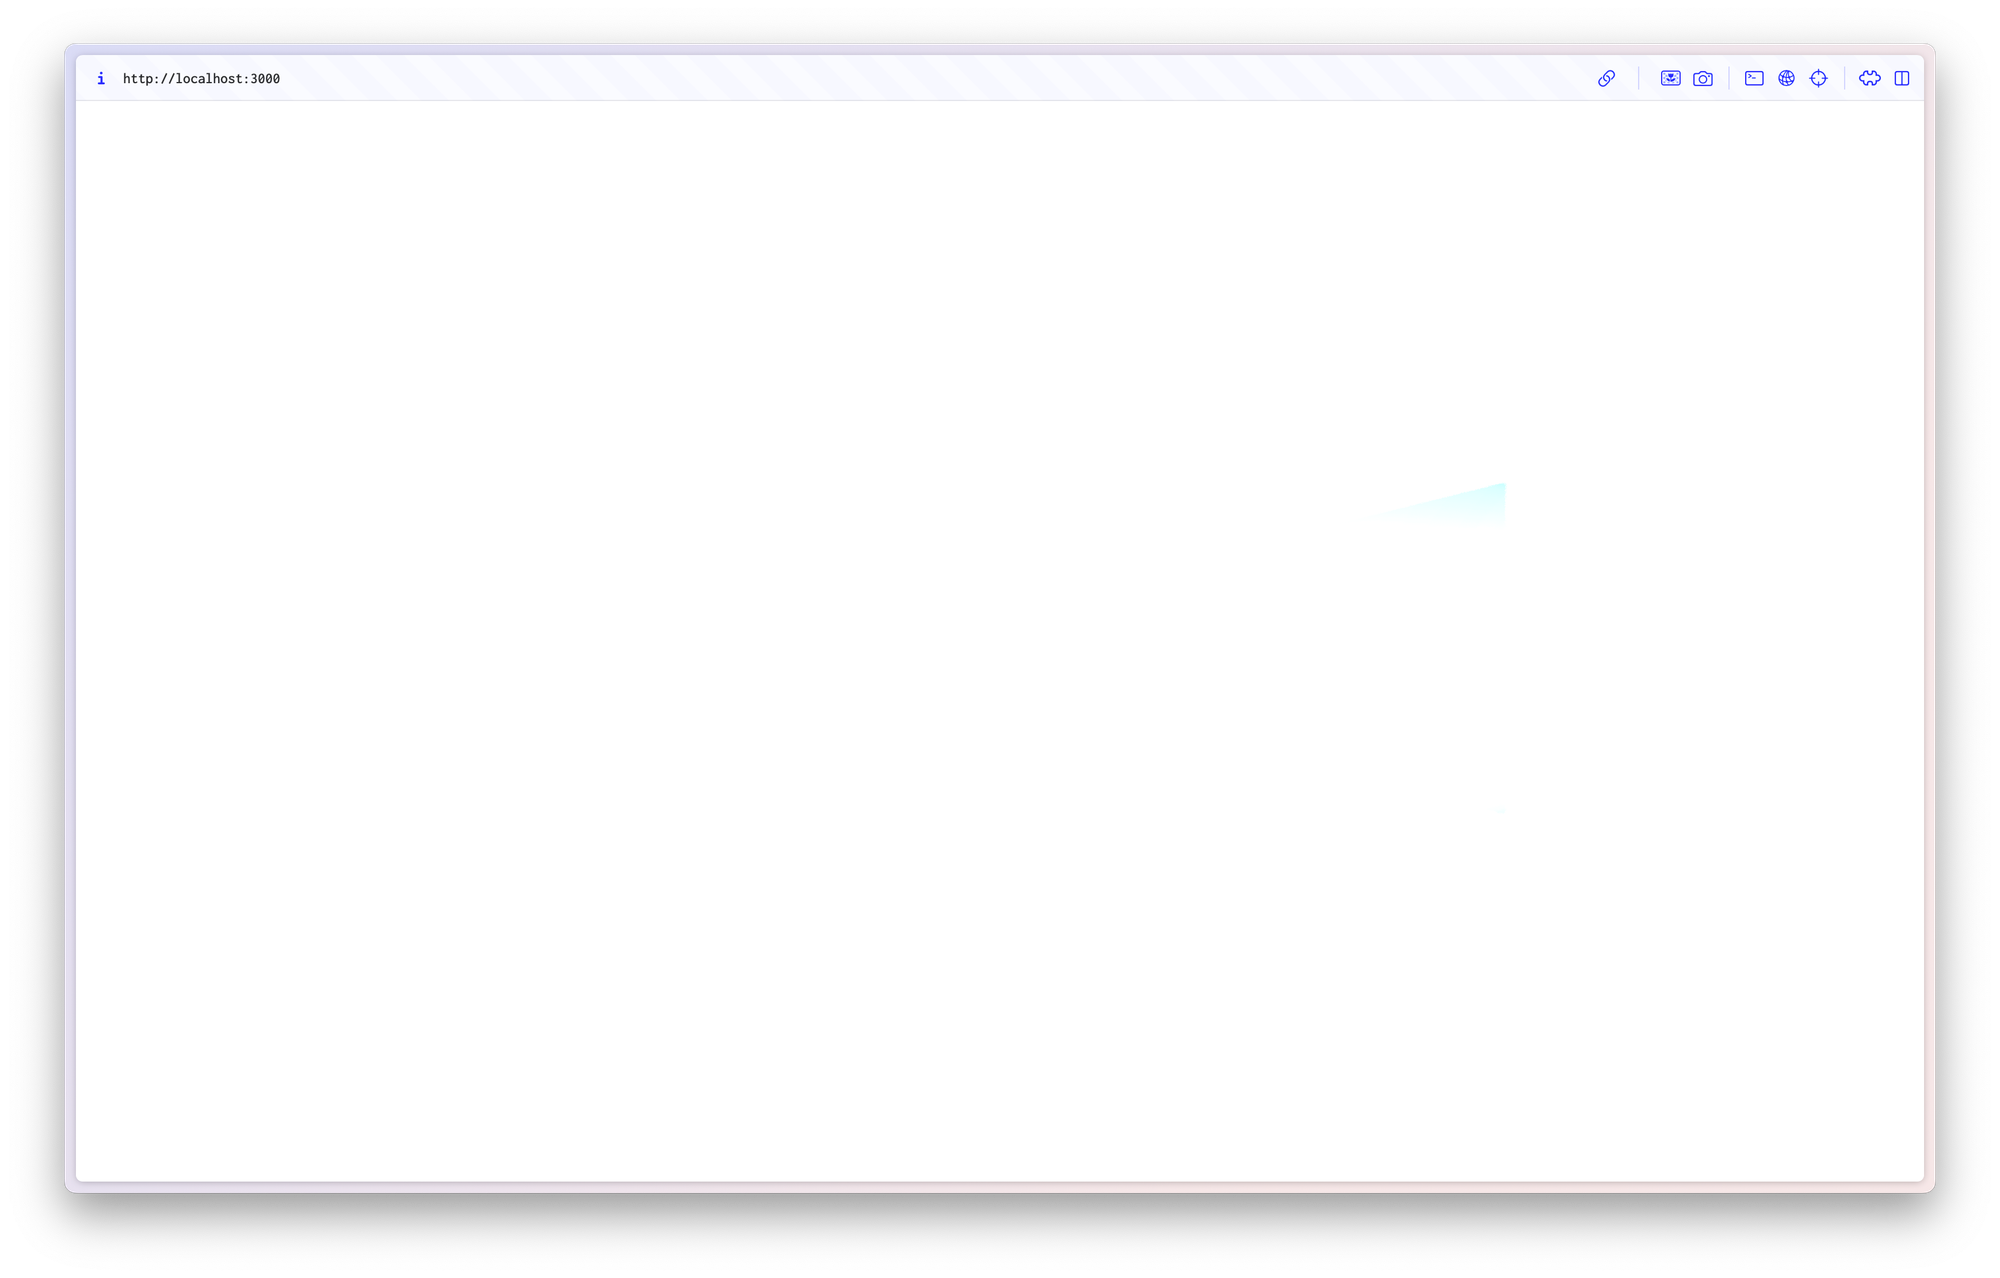
The problem: Transparency. Not all shaders write fully opaque pixels, some of them are transparent. Whenever they are transparent, things tend to look bad. To fix this, we'll need to perform surgery on the shader itself and set the "alpha channel" of each pixel to 1. This requires you to understand a bit of the WebGL basics, so bear with me: The mainImage() function in your FragmentShader is given a pixel coordinate and is supposed to change its pixel color. You can see that in the function definition: void mainImage( out vec4 fragColor, in vec2 fragCoord ). At the very bottom of the function, you'll set the "alpha channel" to 1.0 by calling fragColor.a = 1.0;
In our example above, I'm adding it here:
// ...rest of the shader

void mainImage( out vec4 fragColor, in vec2 fragCoord ) {
    // ... rest of the function

    fragColor.a = 1.0;
}

void main() {
  mainImage(gl_FragColor, gl_FragCoord.xy);
}
And then, finally, we have a working Shadertoy shader in Three.js:
Find the code on GitHub
You can find the demo code for this tutorial on GitHub - together with a deployed live demo.